Men High-Top Basketball Shoes Men's Zapatos Hombre Cushioning Sneakers Male Breathable Outdoor Sports Couple | Спорт и
US $24.96 - 28.80


Новое поступление

Магазина ShenZhen Higtek Fiber Optical Company работает с 21.05.2015. его рейтинг составлет 85.71 баллов из 100. В избранное добавили 95 покупателя. Средний рейтинг торваров продавца 4.7 в продаже представленно 940 наименований товаров, успешно доставлено 127 заказов. 14 покупателей оставили отзывы о продавце.
Характеристики
*Текущая стоимость 2 361,42 уже могла изменится. Что бы узнать актуальную цену и проверить наличие товара, нажмите "Добавить в корзину"
| Месяц | Минимальная цена | Макс. стоимость | Цена |
|---|---|---|---|
| Aug-18-2025 | 2998.75 руб. | 3058.21 руб. | 3028 руб. |
| Jul-18-2025 | 2432.37 руб. | 2481.20 руб. | 2456.5 руб. |
| Jun-18-2025 | 2951.42 руб. | 3010.49 руб. | 2980.5 руб. |
| May-18-2025 | 2928.7 руб. | 2987.14 руб. | 2957.5 руб. |
| Apr-18-2025 | 2337.83 руб. | 2384.60 руб. | 2360.5 руб. |
| Mar-18-2025 | 2880.47 руб. | 2938.49 руб. | 2909 руб. |
| Feb-18-2025 | 2857.64 руб. | 2914.82 руб. | 2885.5 руб. |
| Jan-18-2025 | 2833.76 руб. | 2890.65 руб. | 2861.5 руб. |
Описание товара


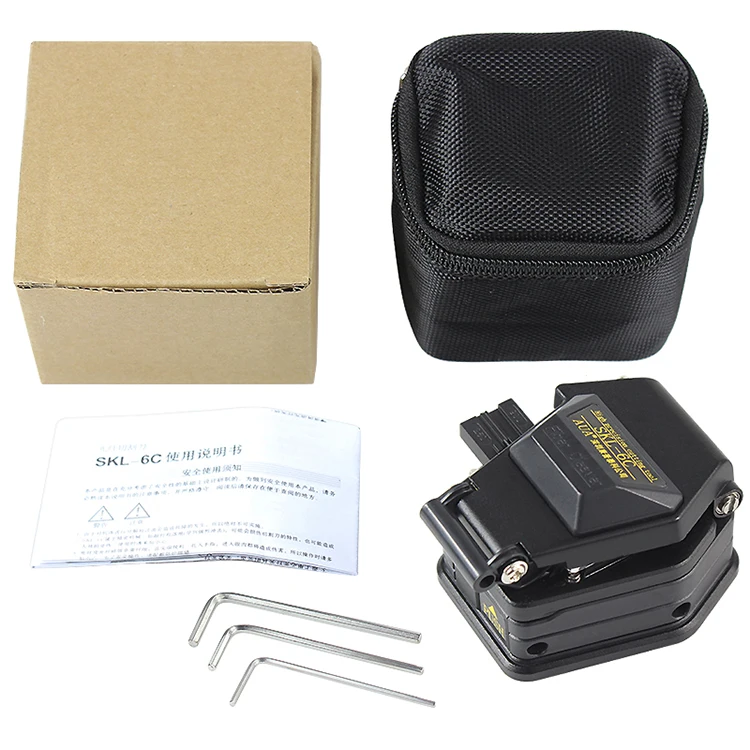
Description: 1. Please lift up the top lever of optical fiber cover. Open the cover clip of single-core fiber clamp. Confirm that the sliding bar of cutter is at the fort position. 2. Put the optical iber into the groove of single-core fiber clamp. Align the coating line with the scale of proper cutting length of optical fier. (For instance, if the cutting length is 18m, align the coating line with the position of 18mm on the scale.) Then check the bare fiber whether it is straight. 3. The optical fiber and fiber chips are very tiny and sharp. If it is penetrated into the finger or eye, it will al cause the injury. It thus should be very careful during the operation. For the safe operation, the operator should wear the protective glasses. 4. Please throw the fiber chips into the special container that is separated from general garbage. 5. the cutter installed on the machine is very sharp. Do not touch i by hands, otherwise it may hurt your hands. 6. Please be noted that if the top levar of optical fiber cover is impacted, it will also cause the failure. The damaged top lever will reduce the performanc of fiber cleaver. 7. In case of the failure or abnormal conditions, please stop the operation. Do not disasemble or modify the machine. Please contact the service department of our company as mentioned below. Requirements on the replacement of fiber cleaver using the original cutter. To guarantee the quality and performance of the SKL-6C, the precondition for no need of adjusting the cutting force after the replacement of cutter is to use the original cutter of fiber cleaver. Warning 1: When using the non-optical adjusting cutter for the replacement, i may be unable to replace and install the cutter or adjust the cutting force. SKL-6C adopts the special cutter fixing screw and it's no need to adjust the height of cutter even turming the cutting edge. Therefore, if using the non-original cutter for the replacement of fiber cleaver, the installation may fail. Besides, the cutting-force adjusting screw(the one in red below) is also matched with the precision of original cutter. If using the replacement cutter of other manufacturers, the height of cutter may not be adjusted.
Warning 2: If using the non-original cutter for the replacement of fiber cleaver, it will be unable to quarantee i quality and performance. 1. Introduction Applicable Diameter of Bar Fiber: 125um Applicable quantity of fiber core: Single core(0.25 & 0.9mm)-12 core ribbon fiber-2.5 covered wire Cutting Length for Optical fiber: 18mm Dimension: 71.2(w) x 67.2(D) x 52(H) mm Weight: 230g
2. Operations (1). Please lift up the top lever of optical fiber cover. Open the cover clip of single-core fiber clamp. Confirm that the sliding bar o cutter is at the front position. (2). Put the optical fiber into the groove of single-core fiber clamp. Align the coating line with the scale of proper cutting length of optical fiber. (For instance, if the cutting length is 18mm, align the coating line with the position of 18mm on the scale.) Then check the bare fiber whether it is straight. (3). Cover the cover clip of single-core fiber clamp to clamp the fiber. (4). Please close the optical fiber cover and put down the top lever. Push the sliding block of cutter to cut off the optical fiber. Lift up the top lever of optical fiber cover. Open the cover, press the fiber and open the single-core fiber clamp. Take out the fiber and clear the fiber chips.
3. Maintenance Daily Cleaning To maintain the cutting performance of fiber cleaver, t s essential to perform the daily cleaning. Please clean the cutting edge, the rubber block that clamps the fiber and pillow block using the cotton awab with the anhydrous alcohol. the loading chute of fiber clamp and groove of single-core fiber should also be cleaned. Attention: . In case of anydust on the cutter or fiber clamping block, the cutting performance may be reduced and it may also be impossible to achieve the smooth cutting end face of optical fiber. . When cleaning the machine, do not use th fluid except the alcohol. . If the fiber chips left on the rubber part of fiber clamping block, the cutting performance may be reduced and it may also be impossible the achieve the smooth cutting end face of optical fiber. Adjusting Method of Cutting Edge After many times of cutting, the cutting will be consumed, resulting in the situations of unable cutting off or detective cutting end face. If the situation continues, it will be necessary to adjust the position of cutting edge. Please adjust the direction of cutting edge and adopt the new position of cutter according to the following steps. [Reference] Number of cutting for 1 point of cutting edge; 1000 core wir 1: Open the right decorative cover using the cross point screwdriver. 2: Please use the slotted screwdriver to loosen the screw fixed on the cutter. 3: Turn the cutter to the next new cutting edge. Use the cotton swab to press the side or front of cutter and push it outside. It will then be easy to turn the cutter.
Attention . When changing the position of cutting edge(turning the cutter), do not turn the cutter by hands directly. . Do no use the metal tools(such as the tweezers) to turn the cutter. The use of metal tools may damage the cutter. 4: Fasten the fixing screw for the cutter [Reference] The proper fastening torque is about 0.98 Nm(10 kg f*cm)
Attention . Please be noted that do not over-fasten the fixing screw fot the cutter, otherwise it may damage the screw. 5: Try to cut off the fiber 1 or 2 times. Use the screen of fusion splicer to confirm the cutting end face of fiber. If the cutting end face is not favorable, please adjust the height of cutter.(Please refer to adjusting method of height of cutter.) 6: Adjust the cutting angle. If the fusion effect is favorable, please lock the right decorative cover.
Adjusting Method for Height of Cutter 0: SKL-6C, please take down the right decorative cover at first. 1: Please loosen 2 fixing screws. 2. Please loosen the screw that is used to fix the height of cutter. 3: Put the automatic pencil core or wooden thin bar on the fiber clamping block. Move the sliding bar of cutter back and forth and rotate the adjusting screw for the height of cutter at the same time. The highest point of cutter edge that contacts the pencil core or wooden thin bar is treated as the reference point (0um). Key Points . When adjusting the height of cutter upwards, it should loosen the height adjusting screw at first and then rotate it along the clckwise direction. . When adjusting the height of cutter downwards, it should rotate height adjusting screw along the anticlockwise direction at first and then fasten the screw. (Please use the cotton swab to press the cutter downwards and then rotate the height adusting screw ath the same time.) When adjusting the height of cutter downwards, it should use the cotton swab to press the cutter downwards and then rotate the height adjusting screw along the anticlockwise direction at the same time. 4. Please rtate the height adjusting screw 1/4-1/2 circle along the clockwise direction from the reference point.
Attention . Please be noted that the height of cutter should not be adjusted too high, otherwise it may damage the pillow block and fiber end face. 5. Please fasten the fixing screw for the height of [Reference] Proper Fastening Torque: about 0.59N.m(6kgfcm) 6. Please fasten 2 fixing screws that are loosened in Step 1. [Reference] Proper Fastening Torque: about 0.98N.m(10kgfcm) Replacement of Cutter 0: SKL-6C, please take down the right decorative cover at first. 1. Take down the fixing screw of cutter. 2. Please use the too such as tweezers to take out the cutter. Please be noticed that the cutter should not touch other parts. Attention: . The cutter is precisely ground if the cutter edge touches the metals, it may be damaged and this be unable to achieve the normal cutting performance. Please be careful during the operation. . When using the metal tweezers, do not damage the cutter edge. . When taking the cutter, please use the gloves, but not the hands to touch it directly. . Please separate the removed cutter from the normal garbage. It should be treated proeperly. 3. When installing the new cutter, please make the marker of "1" upwards. Put the cutter on the fixed plane of cutter fixedplate. Puch it into the groove slightly. At the same time, please align the central hole of cutter with the central position of screw hole at the installation side. 4. Please press the side surface of cutter using the finger. Fasten the fixing screw.[Reference] Proper
Fastering Torque: about 0.98N-m(10kgfcm) 5. Please refer to Adjusting Method for Height of Cutter in Page 2 and adjust the height of cutter according to related step. 6. Install the right decorative cover after being adjusted. Poor Cutting(damaged cutting surface) Reasons to cause the poor cutting may include: (A) The optical fiber is not put on the cutter straightly. →Please place the optical fiber straightly. (B) The position of cutter is too high. →Please adjust the height of cutter. (C) There are wastes on the fiber clamping block. →Please clean the fiber clamping block (D) There are foreign materials such as the dust on the cutter. →Please clean the cutter. (E) There are foreign materials such as the dust on the optical fiber. →Please remove the fiber coating and clean the part of bare fiber. →The upper and lowesr presure pad for the optical fiber may be loosened during the transportation.If the poor cutting continues, please contact the department of maintenance surface of our company. Leveling Method There may be the clearance of upper and lowest pressure pad during the transportation of SKL-6C. A. Take down the fiber clamp at first and then loosen 3 hex screws on the fast enings; B. Align the upper and lower presure pad and clench it by the left hand(guarantee that there is no clearance of pressure pad and then fasten 3 hex screws); C. Observe the whole machine whether there is any clearance of pressure pad in the sunlight. If no, please continue the cutting. If yes, please repeat steps of A and B. shipping
1. We will send the goods within 5 business days after the full payment has been confirmed.
2. We can provide the international shipping services as follows:
China Post Air Mail, HK Post Air Mail, EMS, TNT, DHL, UPS The default way is by China post air mail and HK post air mail.
3. The buyer is responsible for insurance problems and damage which caused by shipping service such as accidents, delays or other issues. Besides, we are not responsible for any custom duty or import tax these charges are not included in the item price and shipping cost.
WARRANTY&GUARANTEE
1. All the goods are inspected and tested before shipment. if you are not satisfied with the goods, you can exchange the items within 7 days and you must contact us within 24 hours after the receipt of the items.
2. The shipping and handling charge is not refundable and customer should be responsible for all the charges of returning and reshipping.
3. All return items must be in its original conditions, including box and accessories. Man-made defects are not guaranteed, such as broken, scratched and so on.
4. For any items, please use EMS or your local post when send back
FEEDBACK
1. Buyer's early confirmation will be highly appreciated after receiving the items.
2. Since your feedback is very important to our business's development, we sincerely invite you to leave positive feedback for us if you are satisfied with our product and service. It'll just take you 1 minute, but this 1 minute has the extremely vital significance to us.
3. Please contact us before leaving any negative or neutral feedback. We will work with you to solve any problems Thank you for your understanding
Смотрите так же другие товары:


![[Buy 3 get 1 free] Women Panties Briefs Cotton Comfortable Sexy Women's Underwear Woman Pants Plus Size |](http://ae01.alicdn.com/kf/HTB1CYHKdv9TBuNjy1zbq6xpepXaS/Buy-3-get-1-free-Women-Panties-Briefs-Cotton-Comfortable-Sexy-Women-s-Underwear-Woman.jpg)